
Lights, camera, action! Ever dreamed of capturing that perfect shot but felt overwhelmed by the process? You’re not alone. Many aspiring photographers find themselves lost in the maze of planning a photoshoot, unsure where to begin or how to ensure success.
Picture this: You’ve got a vision, but translating it into reality seems daunting. The equipment, the location, the lighting – it’s enough to make your head spin! But what if we told you that with the right steps, you could transform your photoshoot from a stressful experience into a smooth, enjoyable journey? From the initial planning stages to the final touches in post-production, we’re about to unveil the essential steps that will elevate your photography game. Ready to turn your creative vision into stunning images? Let’s dive into the world of successful photoshoots, exploring the crucial elements of planning, prepping, lighting, and post-production that will make your next session picture-perfect!

Conceptualizing Your Vision
Before diving into the technical aspects of your photoshoot, it’s crucial to develop a clear concept. Start by brainstorming ideas and creating a mood board. This visual representation will help you refine your vision and communicate it effectively to your team or clients.
Choosing the Right Location
Selecting the perfect location is paramount to bringing your concept to life. Consider the following factors:
- Accessibility
- Lighting conditions
- Background aesthetics
- Permit requirements
| Location Type | Pros | Cons |
|---|---|---|
| Studio | Controlled environment, versatile | Can be expensive, may lack character |
| Outdoor | Natural light, unique backdrops | Weather-dependent, less control |
| Urban | Diverse settings, interesting textures | Potential crowds, noise issues |
Assembling Your Team
A successful photoshoot often requires a skilled team. Depending on the scale of your project, consider recruiting:
- Makeup artists
- Hair stylists
- Wardrobe stylists
- Assistants
Clearly communicate your vision to ensure everyone is aligned with the project goals.
Creating a Shot List
Develop a detailed shot list to maximize efficiency during the shoot. This should include:
- Specific poses or compositions
- Required equipment for each shot
- Estimated time for each setup
By thoroughly planning these aspects, you’ll set a solid foundation for a successful photoshoot, ensuring that you capture all the necessary elements to bring your vision to life.
Equipment Checklist
Before embarking on your photoshoot, it’s crucial to ensure you have all the necessary equipment. Here’s a comprehensive checklist to help you prepare:
- Camera body and lenses
- Memory cards and spare batteries
- Tripod and remote shutter release
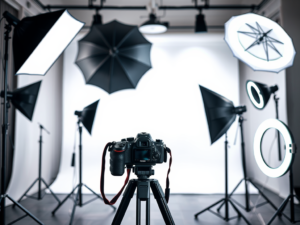
- Lighting equipment (flashes, softboxes, reflectors)
- Props and backdrops
- Cleaning kit (microfiber cloth, sensor cleaner)
Location Scouting
Choosing the right location can make or break your photoshoot. Consider the following factors:
- Accessibility
- Lighting conditions
- Permits required
- Backup options in case of bad weather
Model Preparation
If you’re working with models, ensure they are well-prepared for the shoot:
| Aspect | Details |
|---|---|
| Wardrobe | Coordinate outfits, bring backup options |
| Makeup | Discuss desired looks, schedule professional makeup artist if needed |
| Posing | Practice poses beforehand, prepare reference images |
Shot List
Creating a shot list helps you stay organized and ensures you capture all the necessary images:
- List specific shots you want to achieve
- Prioritize shots based on importance
- Include variations for each shot (different angles, poses)
- Allow flexibility for spontaneous ideas during the shoot
With these preparations in place, you’ll be well-equipped to handle the challenges of the photoshoot.
Natural vs. Artificial Lighting
When it comes to photoshoots, lighting plays a crucial role in creating stunning images. Understanding the difference between natural and artificial lighting can help you make informed decisions for your shoot.
| Natural Lighting | Artificial Lighting |
|---|---|
| Soft and flattering | Controllable and consistent |
| Changes throughout the day | Available anytime |
| Free to use | Requires equipment investment |
| Limited control | Highly customizable |
Natural lighting offers a soft, organic look that’s particularly flattering for portraits and outdoor scenes. However, it’s subject to weather conditions and time of day. On the other hand, artificial lighting provides consistency and control, allowing you to create specific moods and effects regardless of external factors.
Lighting Techniques
Mastering various lighting techniques can elevate your photoshoot:
- Three-point lighting: A classic setup using key, fill, and back lights
- Rembrandt lighting: Creates a dramatic, moody effect with strong shadows
- Butterfly lighting: Ideal for beauty shots, creating a butterfly-shaped shadow under the nose
- Low-key lighting: Emphasizes contrast and creates a dramatic atmosphere
- High-key lighting: Produces bright, airy images with minimal shadows
Experimenting with these techniques will help you develop your unique style and adapt to different shooting scenarios. Remember, the right lighting can make or break your photoshoot, so take the time to understand and practice these essential concepts.
A. Brian Rodgers Jr.
Brian Rodgers Jr. is a renowned expert in post-production techniques, particularly in the realm of fashion and commercial photography. His expertise has revolutionized the way photographers approach the editing process, making him a valuable resource for both novice and experienced photographers alike.
Key Contributions to Post-Production
| Contribution | Impact |
|---|---|
| Color Grading Techniques | Enhanced visual appeal and brand consistency |
| Retouching Methods | Improved final image quality while maintaining authenticity |
| Workflow Optimization | Increased efficiency in post-production processes |
Brian’s approach to post-production emphasizes:
- Preserving the integrity of the original image
- Enhancing rather than altering the subject’s natural features
- Maintaining consistency across a series of images
- Optimizing workflow for efficiency without compromising quality
His techniques have become industry standards, particularly in fashion and commercial photography. By focusing on subtle enhancements and maintaining a natural look, Brian has helped shift the industry away from overly edited images towards a more authentic aesthetic.
Photographers looking to improve their post-production skills can benefit greatly from studying Brian’s methods. His techniques not only improve the final product but also streamline the editing process, allowing photographers to spend more time behind the camera and less time in front of the computer.
Conclusion
A successful photoshoot requires careful planning and attention to detail. By following the essential steps outlined in this post – from thorough planning and preparation to mastering lighting techniques and post-production skills – you can elevate your photography to new heights.
Remember, the key to a great photoshoot lies in the preparation. Take the time to plan your concept, scout locations, and communicate clearly with your team or subjects. Invest in proper equipment and lighting setups to achieve the desired look. Finally, hone your post-production skills to bring your vision to life. With practice and dedication, you’ll be well on your way to creating stunning, professional-quality photographs that captivate your audience.